Resources
| Datum | Description |
|---|---|
| 1st potion | ~2:10, on first Uprooted Agony (opens in a new tab) debuff (100% bonus damage burn phase) |
| 2nd potion | N/A (On Mythic, probably worth potting on pull then use 2nd ASAP after 2nd post-roots burn phase) |
| Lust | ~2:10: On first Uprooted Agony (opens in a new tab) debuff |
| Big heals | During 20-sec Uprooted Agony (opens in a new tab) period, high raid-wide AoE |
| Utility talents | AoE stun, speed boosts |
Overview
Gnarlroot is a 2-phase fight with a 20-second intermission high healing and high damage burn period at the end of each Phase 2.
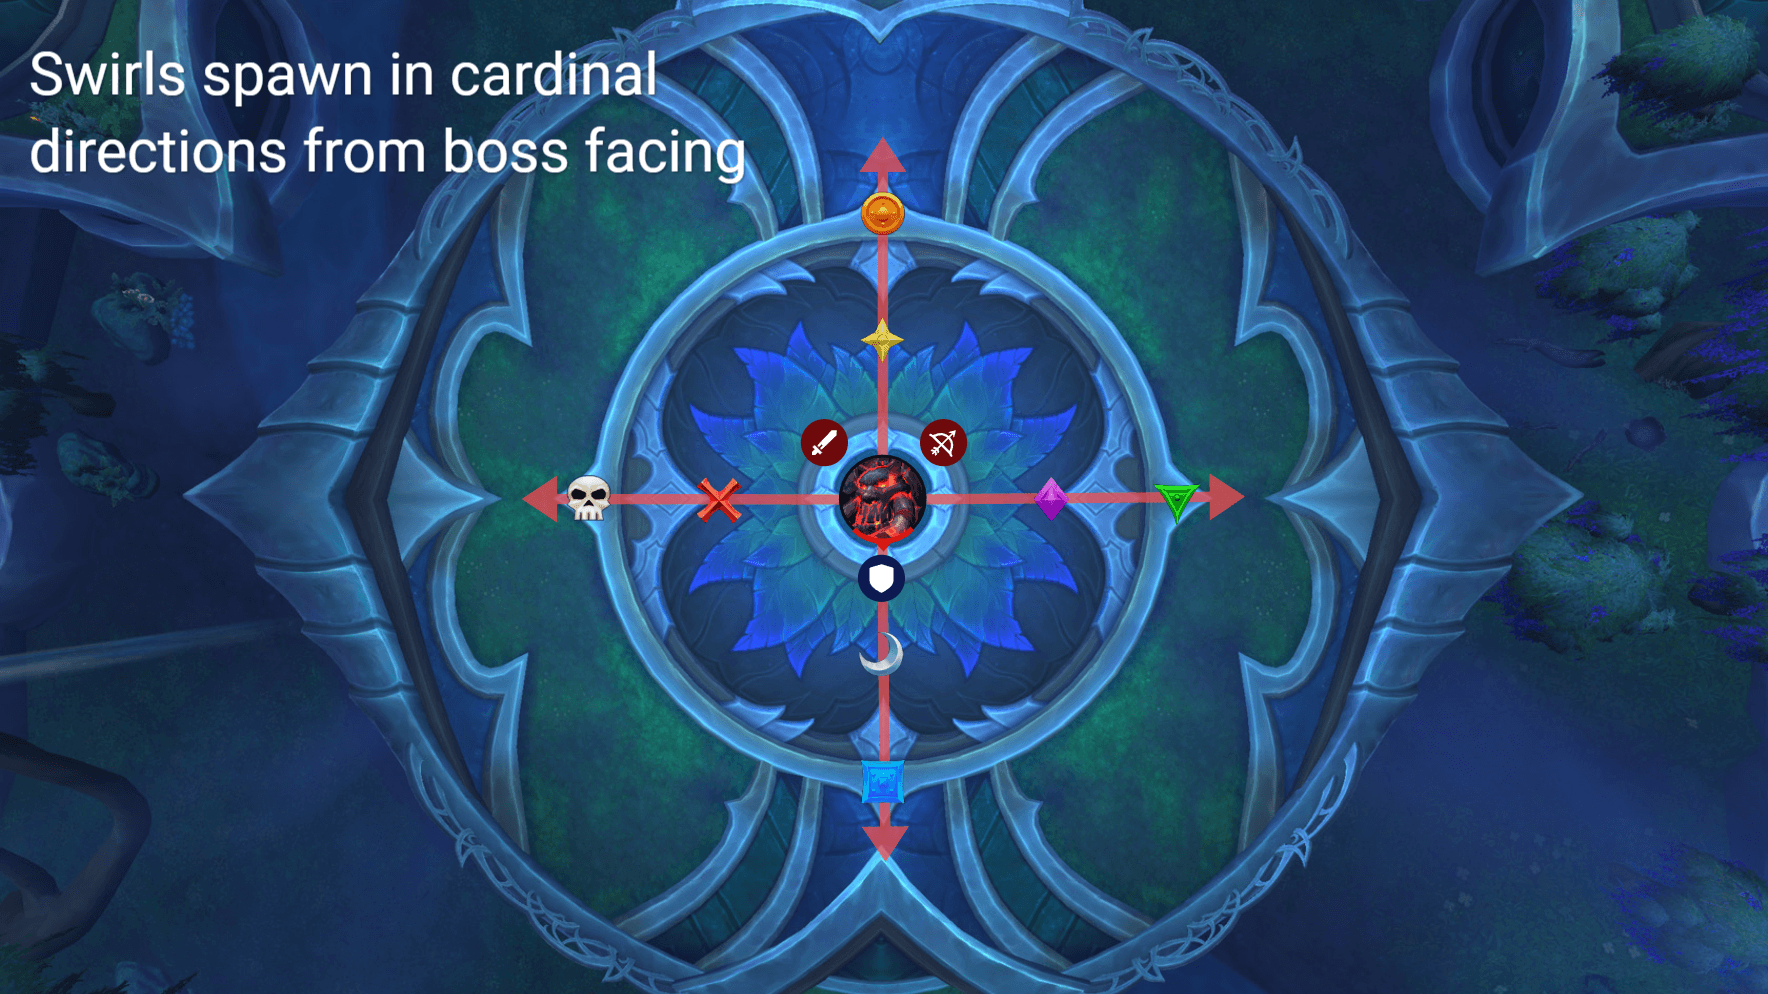
- Phase 1, the boss spawns lines of swirls with dormant adds in the four cardinal directions from his facing. The raid must drop puddles that cover those dormant adds to activate them over the course of the phase.
- Phase 2, the boss takes 99% reduced damage and spawns 4 sets of roots. The raid must soak small puddles that deal DoT damage but allow you to burn away the roots by touching them.
- Once all roots are destroyed, the burn period begins.
Multiple adds will spawn throughout the fight, but the main focus should be single-target damage.
Key mechanics
 Tanks swap for every Dreadfire Barrage (opens in a new tab) and use magic-based CDs.
- Flaming Pestilence (opens in a new tab) - 4 lines of swirlies in cardinal directions from boss. Dormant Tainted Lashers spawn from some swirls.
- Tactic Tanks must keep the boss centered and facing a cardinal direction to force swirl positions. Tanks are advised to set a Countdown.
- Tactic
- Critical Countdown Controlled Burn (opens in a new tab) - 4 random

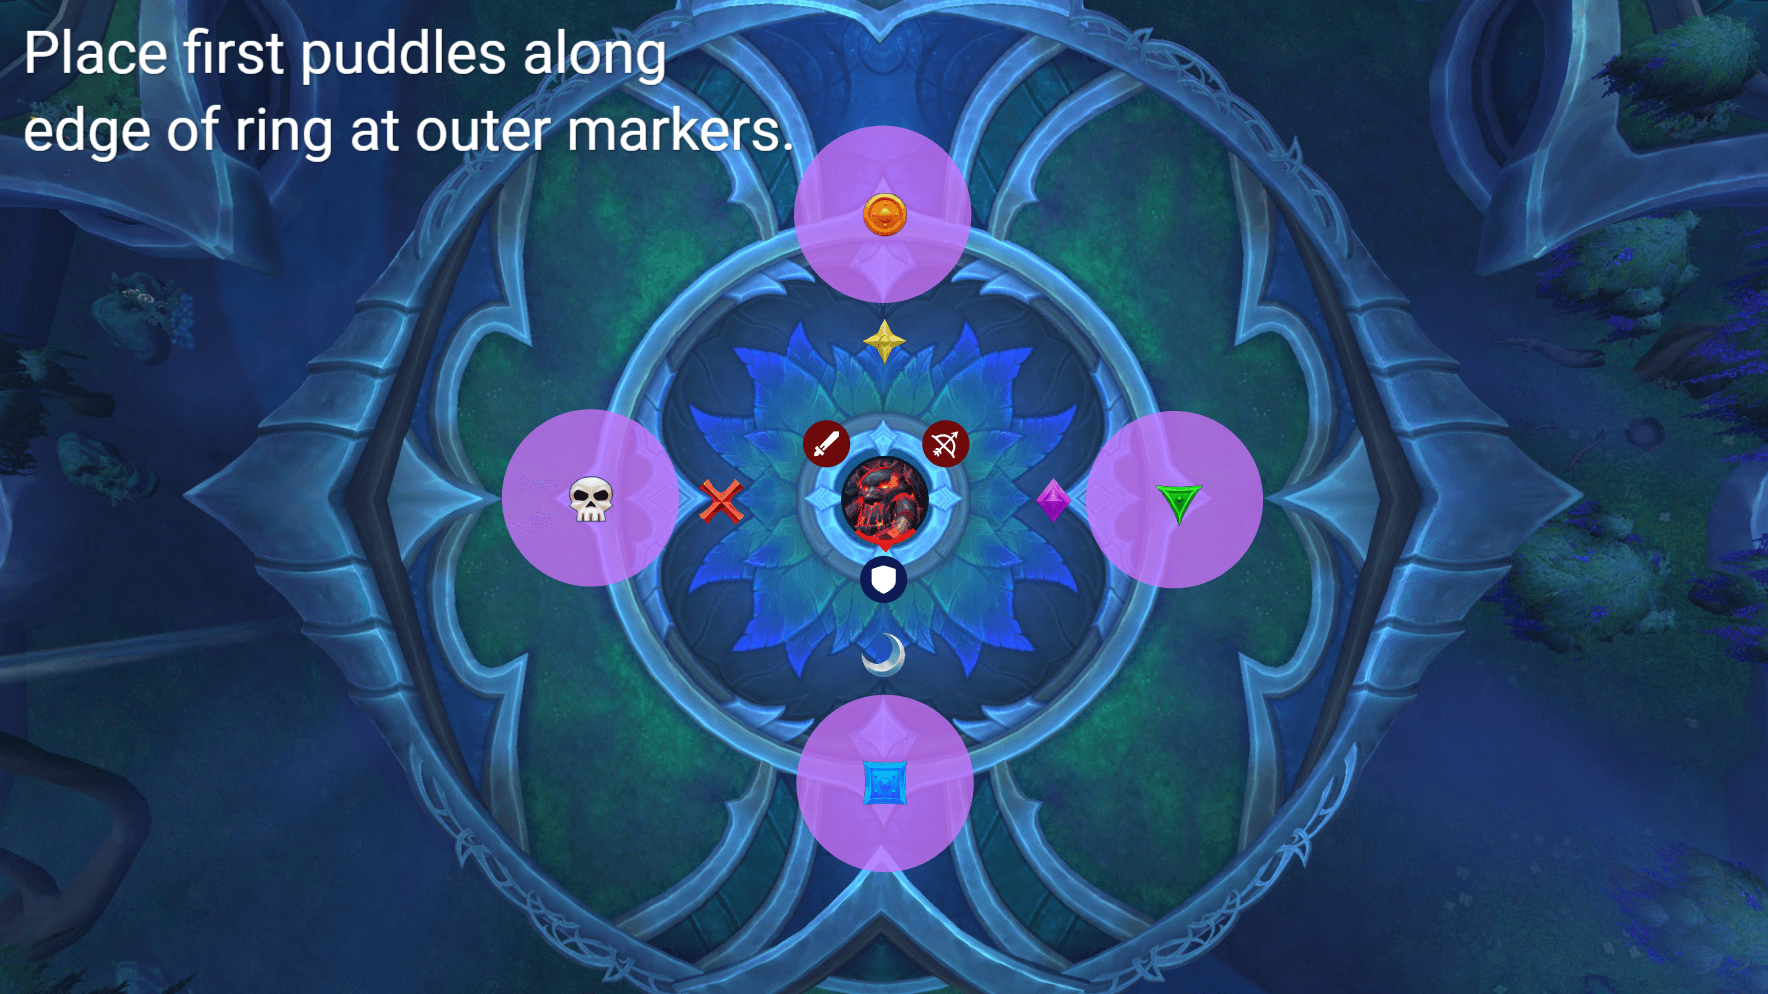
 non-tank players (one healer and three DPS) get debuffed. After 6 seconds, the debuff expires and leaves a Shadow-Scorched Earth (opens in a new tab) puddle that lasts for the rest of the phase.
- Tactic If afflicted, you must run to the assigned OUTERMOST raid marker position to drop your puddle. See Phase 1 for more details.
- Every ~30 seconds (three times per phase), the boss faces a random non-tank player and casts the conal Shadowflame Cleave (opens in a new tab).
- At the start of Phase 2, the boss spawns 4 sets of Doom Roots in the four cardinal directions around him.
- Tactic 2-3 non-tank players must soak the Splintering Charcoal (opens in a new tab) swirls and quickly run along the roots to burn them. You have 10 seconds and can clear up to 5 root sections per soak.
- Tactic 2-3
- Critical At the end of Phase 2, the boss takes 100% additional damage and deals massive raid-wide AoE damage for 20 seconds.
- Tactic
- DPS: Save personal CDs and bloodlust for this burn period.
- Healers: Coordinate raid CDs for this AoE damage period.
- Tactic
Strategy
Phase 1
Twice per phase, Flaming Pestilence (opens in a new tab) cast spawns 4 lines of swirlies in cardinal directions from the boss. Dormant Tainted Lashers spawn from some swirls.
- Twice per phase, Controlled Burn (opens in a new tab) debuffs 4 random non-tank players (one healer and three DPS). After 6 seconds, the debuff expires and leaves a Shadow-Scorched Earth (opens in a new tab) puddle that lasts for the rest of the phase.
- Any dormant Tainted Lashers inside a Shadow-Scorched Earth (opens in a new tab) puddle will activate, deal minor raid-wide AoE damage (opens in a new tab), and start casting a stacking Shadow Spines (opens in a new tab) DoT on random players.
- Tactic Tainted Lashers are CCable and should be grouped / killed ASAP.
- Every ~30 seconds (three times per phase), the boss faces a random non-tank player and casts the conal Shadowflame Cleave (opens in a new tab).
-
On the 1st set of Controlled Burn (opens in a new tab), afflicted players must run to the assigned OUTERMOST raid marker position to drop their puddle.
-
A subset of the furthest Tainted Lashers will spawn and should be gathered by the
tanks and killed via DPS cleave. -
A second Flaming Pestilence (opens in a new tab) swirls will spawn, but the existing outer puddles will immediately activate the outermost Tainted Lashers.
-
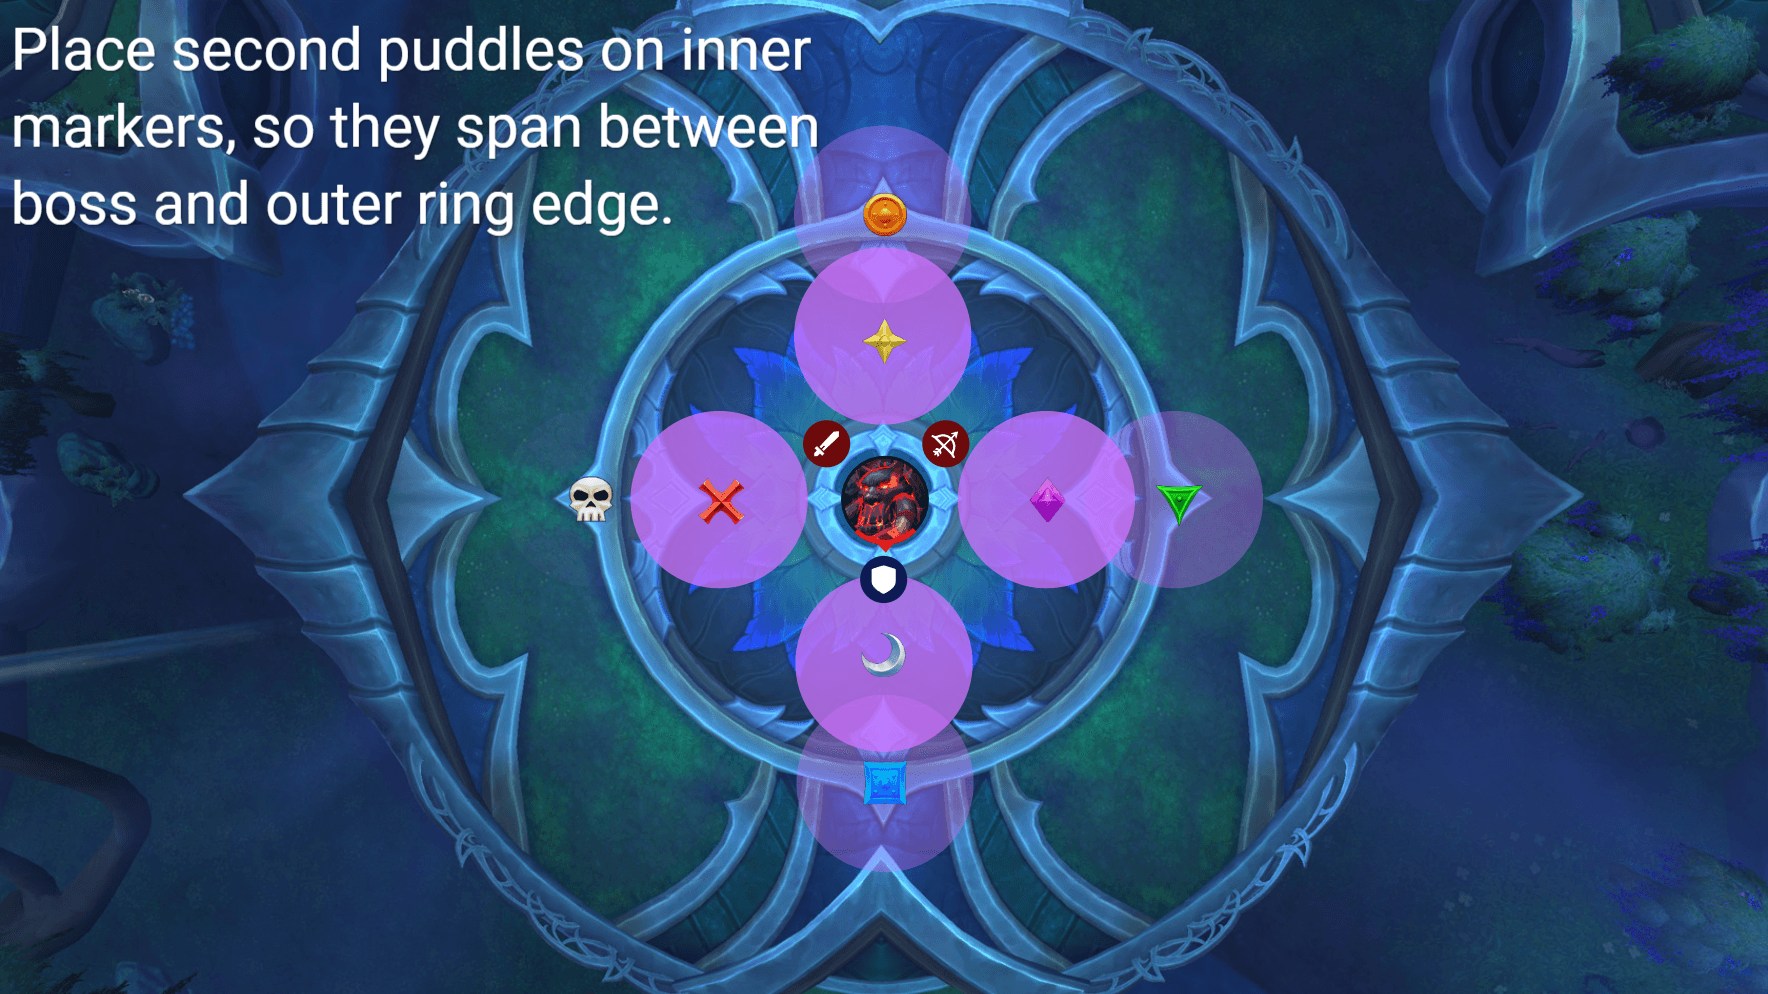
On the 2nd set of Controlled Burn (opens in a new tab), afflicted players must run to the assigned INNERMOST raid marker position to drop their puddle.
-
Again,
tanks should gather while DPS kill the Tainted Lashers, in preparation for Phase 2.💡The goal here is to maintain consistent boss facing and therefore consistent Flaming Pestilence (opens in a new tab) line directions. This ensures nearly all dormant Tainted Lashers are activated by the combination of the first and second puddle sets.
🚫A bossmod / WeakAura will handle auto-marking Controlled Burn (opens in a new tab) afflicted players, so marker positions can be automatically announced to individuals.
However, pictured markers may need to change based on the pre-determined settings of the bossmod / WeakAura.
Mythic
For every set of Flaming Pestilence (opens in a new tab), two dormant Tainted Treants are also spawned along with the dormant Tainted Lashers.
-
Dormant Tainted Treants must be activated before P2 begins. Ideally, Treants are activated in each pair that they appear so the raid can properly handle and kill them before the next pair or P2 begins.
-
Tactic All
DPS should switch to the Treants as soon as they spawn and kill them ASAP.Once we're comfortable with the fight, we can assign a few
DPS to handle
the Treants while the rest of the raid focuses on the boss.
-
-
Tainted Treants cast Blazing Pollen (opens in a new tab), a 4-sec cast that must be interrupted or it damages and disorients the 5 nearest players.
- Tactic 2 assigned interrupts per Treant is sufficient (one primary and one for backup).
-
Tainted Treants frequently cast Flaming Sap (opens in a new tab) on a few random players, but it does no damage if those players are 5+ yards away from others. This debuff does apply a slow.
- Tactic Debuffed players should stay spread apart from others.
Phase 2
After ~90 seconds in P1, the boss casts Doom Cultivation (opens in a new tab) to start P2. During this phase, the boss takes 99% reduced damage. He'll also immediately spawn 4 sets of Doom Roots in the four cardinal directions around him.
![]() Tanks must immediately pick up any remaining dormant Tainted Lashers,
which all activate at the start of the phase.
Tanks must immediately pick up any remaining dormant Tainted Lashers,
which all activate at the start of the phase.
About 8 seconds into phase 2, a handful of small Splintering Charcoal (opens in a new tab) swirls spawn around the room.
- Players standing in a Splintering Charcoal (opens in a new tab) swirl when it lands gain 5 stacks of Ember-Charred (opens in a new tab). Ember-Charred (opens in a new tab) lasts for 10 seconds and deals moderate damage every second.
- Touching a Doom Root section while afflicted with Ember-Charred (opens in a new tab) causes the root to burn away and removes a stack of Ember-Charred (opens in a new tab).
-
2-3
non-tank players are assigned to each Doom Root section.Any unassigned players can help if they have a sufficient personal cooldown to mitigate the DoT damage.
Tanks can also help with this. -
Players with Ember-Charred (opens in a new tab) should use a personal CD and run to the nearest Doom Root section to burn it away.
-
Try to aim for conjuction points between two root branches for maximum efficiency. Otherwise, run along the edge of the nearest unburned root section toward the next section.
Players with movement speed abilities are ideal to traverse around the roots.
Intermission
When all Doom Roots are burned away Phase 2 ends and a 20-second burn period begins with the boss casting Uprooted Agony (opens in a new tab). During this period, the boss takes 100% additional damage and deals massive raid-wide AoE damage.
Tactic- Raid should bloodlust and use potions.
- DPS should have 2-min CDs available if used on the pull.
- Healers should coordinate raid CDs for this AoE damage period.
Alternative strategies
Wall positioning
This strategy involves tanking the boss against a wall, with the goal of forcing two of the four Flaming Pestilence (opens in a new tab) swirl lines to spawn more bunched up given they're forced by the geometry of the wall.
Pros
- It's easy to cover the wall-facing swirl lines with roughly a single puddle each. Therefore, it reduces the chance that a handful of improperly placed puddles will ruin an attempt by allowing too many dormant Tainted Lashers to remain deactivated prior to Phase 2.
- Raid is more stacked up, which can be good for healers.
Cons
- Critical The raid is forced into a much smaller working area, given that puddles are going to be placed within melee distance on both sides of the boss, plus outward along the two non-wall Flaming Pestilence (opens in a new tab) lines.
- It's harder to maintain consistent boss facing and therefore consistent Flaming Pestilence (opens in a new tab) line directions, since the initial puddle spawns are likely overlapping with tank positions.
In my opinion, this strategy is not worth the tradeoff of a smaller working area and more difficult boss positioning. With the center-position strategy, we can easily cover all four cardinal directions with puddles and activate most dormant adds, without stressing about running out of room or accidentally getting cleaved while avoiding puddles.
We can roughly divide the groups so each 5-man team is assigned a ![]() healer and are positioned at intercardinal spots (or just behind the boss in two packs).
healer and are positioned at intercardinal spots (or just behind the boss in two packs).